GreenScreen Made Really Freakin Cheap And Easy
It seems to me through the ages of doing what I have been doing when it comes to my little film hobby and my little musical career (I can call it that; I had to pay taxes on it one year) and keeping in mind that I've been a starving artist throughout, I've run into a lot of static from so-called professionals in the fields saying that you can't do things the way I do them because you don't get the same results.
For instance: I've used a Shure 58 wireless mic since I started playing out not once have I gotten any kind of interference. One year I was asked to MC the RTO Sullivan's St.Patrick's day Party they were having in their parking lot. Some punk 18 year old "sound technician" that came as a package deal with a bunch of stage audio equipment (that didn't work right all night I might add) had the tenacity to shut off my mic multiple times because it was picking up "tv stations". Bullcrap in a pouch is what I say... I'm getting off track.
Professional video artists will say that these ingredients I'm about to tell you here is a recipe for disaster for doing chroma key. That professional will tell you you have to spend thousands of dollars to get professional results. I say, "not on my watch". But for fun, and maybe so people don't get too mad, I will offer links to the uber-expensive alternatives if you are made of money and don't care about saving it. But then it would beg this blogger to ask, "why are you reading THIS then?"
Material
Finding the right material to use is pretty easy. The colors are usually blue or green. If you know that your subjects will be wearing blue, then blue's gonna be a bad pick for you. I chose green because I see people in blue more often than green. I do have a film idea that involves me wearing my green digital camo BDUs, so I'll have to eventually get some blue material and I promise I will do the same as I did for the green.
Find yourself a typical fabric store. Joann's Fabrics I think is the most common. You can also find some really cheap materials ordering online. Matter of fact, while writing this, I remembered that I bought some really cheap cloth napkins for my wedding so I dug up where that website was and found it. Not only do they still have the cheap napkins, they have green polyester tablecloths that you could totally use... And it's 7 freakin bucks (shipping not included so more than 7 freakin bucks). Here's the link:
http://www.linentablecloth.com/70-inch-square-polyester-tablecloth-valley-green.html
EDIT: Since writing this, that table cloth no longer exists. You can find another table cloth that is green on that site dirt cheap, or you can use blue as well: https://www.linentablecloth.com/catalog/product/view/id/3210/s/90-by-156-inch-rectangular-polyester-tablecloth-royal-blue/category/3/
EDIT: Looks like their website has changed through the year, but it's still up, here's a new link that will probably not work in a while:
https://www.linentablecloth.com/60-x-126-in-rectangular-polyester-tablecloth-royal-blue-table-ready.html...Or you can buy this one which is $250 more BUT it's 8' instead of 6' so keep that in mind (see garbage mask in following blog):
http://www.filmtools.com/8x8grsccat31.html
Holding Up The GreenScreen Material
In the past my mom and I have made numerous items out of PVC piping. Usually to replace very unusually expensive things. Like a multiple guitar guitar stand, microphone stands, and drum cymbal stands (compare $40 to $6). One of these days, I will blog the instructions I have in my head about building a greenscreen holder but, if you feel adventurous, go to the hardware store, Ace, HomeDepot or whatever, and get some pvc piping, preferably the rigid thicker stuff, and two fitting corners and two t-fittings. Cut four lengths the size of your greenscreen [probably smaller though, depending on how you plan to attach your material to it]. You can make feet out of a couple more t-fittings and some PVC that stick out forward or backward like this do-it-yourselfer did:
http://www.diyphotography.net/homestudio/blz/home-made-cheap-diy-backdrop-stand
I would personally take a couple plastic buckets and fill them with cement (since I was already at the hardware store) and let them try with some PVC pieces that I could slide the PVC holder into so that my stand could hold up to slight breezes. So that free-standing stand would set you back probably $20. Or you can get this one for $162 - but it COMES with the [smaller sections of] greenscreen material so you're really getting your money's worth!
http://www.filmtools.com/6x6greenscreen.html
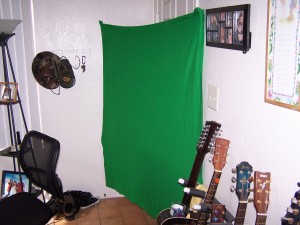
BUT, my friends, I am too cheap and lazy even for that noise. I just use some clear thumbtacks and attach it to the wall. For the pictures you are seeing here, I put together a quick little scenario in my living room to show how to avoid shadows when doing greenscreen. I've learned some tricks throughout my failures like to make sure that your subject is pretty far away from the greenscreen. Otherwise, the green will reflect back off the material and onto objects like tables and chairs and maybe even your subject!
Lighting
There is actually such thing as "lighting theory" and I respect it. I can see the differences based on sunlight that is more blue and incandescent light that is more yellow. I know that your sharpness will rely on ISO settings, lenses, sensors, F-stop and tons of other stuff. But, if you're not quite at that level, then you can do this... Quick and cheap lighting can be found at your local WalMart (or the hardware store if you're making a list) for like 9 dollars.
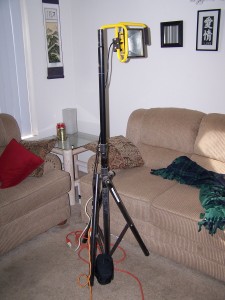
They are your normal construction lights without that wire protective grill that comes with them. These lights are workhorses! 500 W of pure halogen power each. They always come with a spare halogen light bulb. I have only once had to replace a bulb through 6 of these lights I've bought. It's come to my attention that if I ever needed a replacement bulb, I would just buy a new light and get another extra - I think the price is the same.
Now you can make a similar PVC pipe light stand using the bucket with cement or something heavy to hold the base. You will want to get these lights higher rather than lower. That way the shadows that your subject or objects cast will be below the frame that you are shooting. I use the speaker stands I got a long time ago with an old PA system.
If you are blessed with a lot of space, then the further you can move your lights higher and further away (and also your subject away from the greenscreen) the better. But as you can see, I don't have that luxury. You want to use at least two lights to get light on both the left & right side of your subject. You can see how my set up wound up:
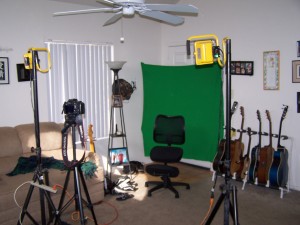
You can see that the primary elements that you need are simply a greenscreen, two lights, and your subject. Just watch your shadows...
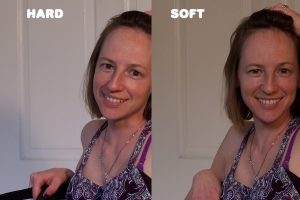
True true, if you use just these yellow lights, it will be hard light. Two of these lights flood your subject with 1000 Watts of LIGHT! Personally, I don't mind. I left these images of my wife to the left here uncorrected in the raw format. I can process and color correct later in editing, but you can see that using a softer light source can virtually illuminate your shadows behind your subject. The videos that I made for this post were just hard light, but just so I can touch on it, I found this at the amazon:
http://www.amazon.com/gp/offer-listing/B002ZIMEMW/ref=dp_olp_new?ie=UTF8&condition=new
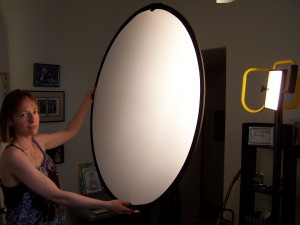
I have yet to build them, but I bet I can build a wire holder and one of those black thick paperclips to hold these up, but you can get a couple of these round disks that have reflectors, dampener, and a soft light filter. You can employ some friends or kids to hold your things up in the meantime:
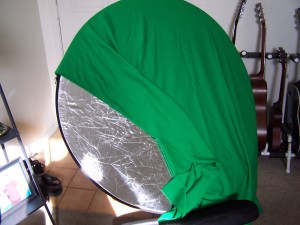
You know, while I'm here, I can tell you that in a pinch, you can take your greenscreen material and attach it to this round thing that you got for $17 with some of those big black paperclips around the edges and you have a portable greenscreen. Or you can buy this one for $229.90; your choice:
http://www.filmtools.com/westcott-chroma-green-curtain-6-by-7.html
Then, also, so you have an alternative, you can get this greenscreen (I would think) material and two softbox lights for $249. Still too much for me to pay for what you get there, but up to you. I would imagine because the price is low, the quality wouldn't be that good:
http://www.filmtools.com/westcott-photo-basics-video-lighting-kit-402.html
Onto the shooting!!
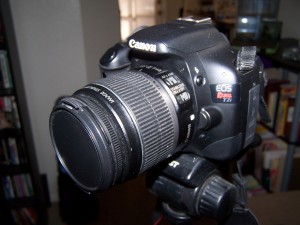
The camera I'm using for these tests today is my Canon T2i (Or d550, same thing). I'm using the stock lens so I can zoom instead of moving the camera around like I would with my 1.8F prime lens that I would use for normal settings. You won't have to worry about F-stop because the green in the background will be gone after processing. It's up to you if you want to really lower your depth of field by making that aperture opened way up to blur out portions of your subject then go for it. The computer will not care if the green is blurry or not. If you don't know what I'm talking about, then don't worry about it.
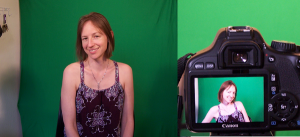
Doing a couple of test shots we can see that because of the lack of space I have, I am still casting some shadows on the wall. But they are manageable in a couple ways. One way is to zoom into your subject more so you remove the shadows from your footage. If you can lift your lights higher that would help too. If you cannot get the shadows out of the shot, you can instruct your subject to keep their head and arms out of the area with the shadows and you can garbage mask it later (see link to following blog below).
Editing Software, Garbage Masking, & Finishing Your Greenscreening
Is that a verb? Greenscreening? Autocorrect says no. I'm going to split this blog up to two blogs so we have a different page to follow for the computer processing part of this as some of you may already know that part.
Comments
Categories
- The Beast 66
- Stupid Stories 64
- On My Commute 31
- Computer Programming 21
- Italian Dual Citizenship 10
- Food 8
- Black Lives Do Matter 8
- Playing Out 5
- Not So Stupid Stories 5
- Quick Projects 4
- Movies I've Made 4
- Scams 3
- Film Projects 2
- Making Movies 2
- Programming Tutorials 2
- The Robot Sbot 2
- Ryvid Anthem 1
- Old Man Rants 1
- 3D Printing 1
- Rental Car Reviews 1
- Other's Music 1
- My Original Music 1
