Automatic Database Backups To A Thumbdrive From Linux For Easy Data Recovery, Duh..
This idea is not a new idea, but not one that is out there as much as it should be. It's a brilliant and cheap idea for data recovery! As most smart things in my life, it started as something quite dumb. The lack of planning. Jake Guzman always told me to follow the 5 p's. Proper Planning Prevents Poor Performance. True it is. About a year ago, I first brought to life my linux server from my old $200 windows box that barely ran. My main idea was to have a server to store media files on a local network. It has spawned into a web server, automation, home security, encryption, photo manipulation, object and face detection, and a great platform for learning all kinds of new languages like PERL, PHP, C, C++, etc etc. All for free.
I started building a database driven site called HomeKeeper (this name has nothing to do with and no affiliation with the patented product line of school products whilst I got the idea for the name). This is a hub that helps with the kids' schedules, chores, home finances, power consumption, security and automation all in one. It is still in development and probably always will be. Anyhow, I had been putting in receipts of most of my purchases so I can look back at the past 3 months and see where our money went and why I have none left.
And then the frickin' hard drive crashed!
Luckily, the fine people at Western Digital added in a feature in their hard drives that will put it into this read-only safety mode that works as a warning to let you know that you're about to loose all your data. Sometimes, hard drive failure sufferers are not as lucky. I had no backup for my data and all those receipts are long gone so I'd have to start all over again.
I went onto the craigsfast and found a couple matching replacement hard drives for $20 a piece. I got two so I could set up a RAID0 system (Redundant Array of Inexpensive Disks - I didn't look that up; but it's something like that). This setup will make a duplicate copy of all the data between each drive so that if one crashes, you can still get to your data. Theoretically, you could replace the broken hard drive and the data from the other one would make its way back to the new replacement drive. That was my solution. Today, about 6 months later, the second hard drive remains unplugged in the box. RAID0's have some work involved in setting them up that I have never gotten to.
Now it's been a year and I've still been saving my receipt information including line items from the grocery store. Just in case I wanted to know how much butter I use in a year. I know, it's useless info, but we actually have looked up stuff like that. We've spent like $700 on chicken alone. Who knew. I needed to find a quicker-to-implement backup solution.
I think I was going number 2 when it occurred to me that we, in this new day and age, use re removable, almost disposable storage everyday. Storage cards, thumbdrives, cell phones - all getting cheaper by the minute! I thought it would be pretty easy to shove a thumbdrive into the back of the server, and then set it up so make a database backup to it. That way if the hard drive crashes, I just yank it out and I have an SQL of my entire database and the data stays right here locally. In case I had something sensitive. Like how much we spend in chicken. We don't want that out.
It wound up being pretty simple, but ran into a few issues along the way that needed some googling. Here I will compile all of the stuff in a simple step by step with code examples lucky you!
Step By Step Instructions
The first thing I did was find and dust off a thumbdrive I'm not using. I chose one in particular that was a great deal a year go. 4 gigabyte for 8 bucks! Whoohoo! I remember in 2010, for our wedding video, I needed to by a 16gb thumbdrive. It was $80 expletive deleted dollars. Today!!! I found the exact same thing online for $8.99. I'm so pissed off. I stir my coffee with it now. I use it for everything. I digress.
When you plug in a USB device, I learned that linux, especially a headless server like mine (no monitor or keyboard), it doesn't just show up like a drive like if you did that with your laptop. At that point it is unmounted (unlike the Canadian police). First, we will find the device by using a command line command dmesg. I thought this was a log... well it is a log. The manual's description says it is "used to examine or control the kernel ring buffer". I don't have a clue what that could mean. It makes me want chicken. All I know is that's where I can find out where my device is. I use/pipe tail with that command so it just spits out the last stuff written since I just plugged in the drive:
cowboy@freddythunder:~$ dmesg | tail


[4170189.313387] scsi 6:0:0:0: Direct-Access                               1.26 PQ: 0 ANSI: 5


[4170189.318002] sd 6:0:0:0: Attached scsi generic sg6 type 0


[4170189.319034] sd 6:0:0:0: [sdf] 7821312 512-byte logical blocks: (4.00 GB/3.72 GiB)


[4170189.320522] sd 6:0:0:0: [sdf] Write Protect is off


[4170189.320534] sd 6:0:0:0: [sdf] Mode Sense: 43 00 00 00


[4170189.321400] sd 6:0:0:0: [sdf] Write cache: disabled, read cache: enabled, doesn't support DPO or FUA


[4170189.336586]  sdf: sdf1


[4170189.342392] sd 6:0:0:0: [sdf] Attached SCSI removable disk


[4170244.782657] FAT-fs (sdf1): utf8 is not a recommended IO charset for FAT filesystems, filesystem will be case sensitive!
I wish I could explain all of this, but I can't. I probably could look it all up for you, but so can you. So if you are curious, google away. I first saw "Attached scsi..." and knew I hadn't attached anything else, so USB drives are scsi (pronounced scuzzy, isn't that fun?) and I can see 4GB - that's it!
Sidebar: I originally figured that sdf was the device, but later found that the device was sdf1 because of the line that reads "sdf: sdf1". I have no explanation for this and was found by trail and error. If you know, please post a comment and let me know. If you don't, then know that the rest of this article deals with the found sdf1. Back to the show:
Naturally, the first thing I did was this:
cowboy@freddythunder:/dev$ cd /dev/sdf1


-bash: cd: /dev/sdf1: Not a directory


cowboy@freddythunder:/dev$
That's not fair. It says "sdf" all over the place. That's when I googled and found that that device is not the drive, but the resource to the drive. I then had to mount that device to a place in the filesystem to use it as a drive. I had to research a few different places to find out how to mount it correctly for my usage but here's the end result:
cowboy@freddythunder:~$ sudo mount -o umask=0 /dev/sdf1 /mnt/thumb
You need to be a root user to mount the drive, that's the sudo, mount is the command, -o specifies an option which your option is umask=0 - this will allow any user access to the drive. You can use this conversely to make the thumbdrive accessible ONLY by the root superuser by omitting that option altogether, but that doesn't fit my needs. Then /dev/sdf1 is the device, and /mnt/thumb is the location in the filesystem where I want to access it. On my distribution (Crunchbang Linux) there was a folder /mnt for me to use. You can mount it just about anywhere that exists. The /thumb did not exist and I had to use mkdir ahead of time to make that.
Automatic Backups!
Now that my drive is accessible, and I made sure by moving one of my website images to the drive and then checking to make sure it's still there (using ls -l to get a directory listing with sizes and permissions):
cowboy@freddythunder:~$ mv /var/www/images/1.png /mnt/thumb/1.png


cowboy@freddythunder:~$ ls -l /mnt/thumb


total 147


-rwxr--r-- 1 cowboy cowboy 147824 Dec  5 17:32 1.png


cowboy@freddythunder:~$
Outstanding! Then I erased it. I found that I could make a database dump on the fly of my database at the command line without needing to log into mysql using the mysql program that comes with mysql, mysqldump.
cowboy@freddythunder:~$ mysqldump --user=yourmom --password=yourmomspassword databasetexas>/mnt/thumb/dbtx.sql
As you could guess, all of that info is just gobblygook. But, you can get the drift of what I'm doing. The command is mysqldump, the mysql user is specified, the password for that user is specified, and then I put the name of my database, a greater than sign (>) and the location and name of where I'm keeping my database dump - what's this????!!! ON the thumbdrive!!
Bonus Notes:
- You do not have to back up your entire database, you can just back up a table by putting
databasetexas texastoasttable>/mnt/thumb/dbtx.sql
- You can name your database dump anything you want and it doesn't have to end with .sql. In case you do not want someone to look at it and immediately know that it is database information.
- The way I did it, the file will be overwritten everyday, if you want to keep multiple backups, leave a comment, I will say how.
Of course, I don't want to use your mom's password that anyone can look at logs or crontabs and get all kinds of access to the database. So, I created a mysql user specifically for this task and limited that user's privileges so that if someone does run across it, it won't get them as far as say, the root mysql admin superuser. Don't use that one. You can accomplish this by command line, or phpmyadmin installed on your server. I, for some reason, used both. So I will show you what I did. First I created a new user and called him "dumper", cause that's what he does.
cowboy@freddythunder:~$ mysql -u root -p


Enter password:


Welcome to the MySQL monitor.  Commands end with ; or \g.


Your MySQL connection id is 689


Server version: 5.5.31-0+wheezy1 (Debian)


Copyright (c) 2000, 2013, Oracle and/or its affiliates. All rights reserved.


Oracle is a registered trademark of Oracle Corporation and/or its


affiliates. Other names may be trademarks of their respective


owners.


Type 'help;' or '\h' for help. Type '\c' to clear the current input statement.


mysql> create user 'dumper'@'localhost' identified by 'dumppass';
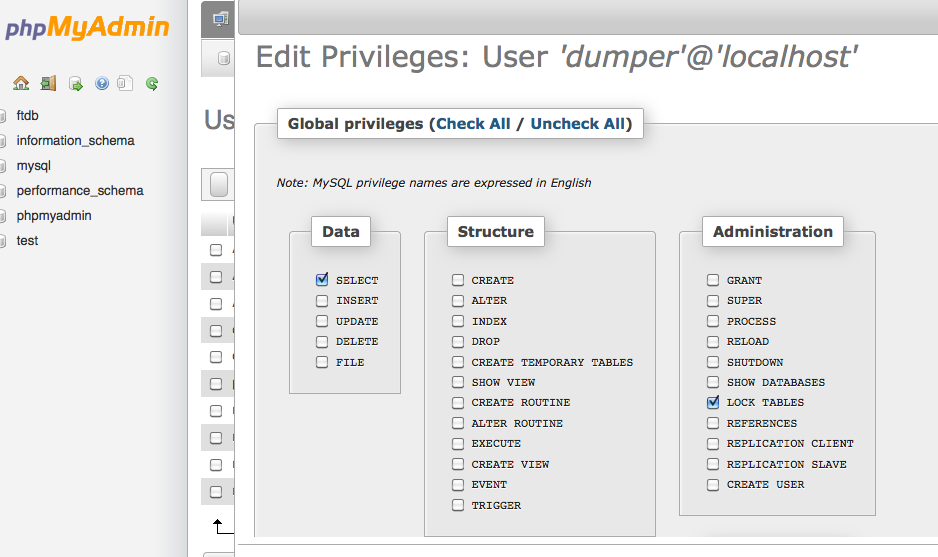
Don't forget the semicolon at the end, you'll be there all day without it. And don't worry, my dumper has a different password. Isn't even on the freddythunder server. Cowboy isn't even a user. Anywho, this creates the new user. Right now this user has no privileges and won't be able to do anything. I log in using my root credentials to phpmyadmin. In the crunchbang world, it's at localhost/phpmyadmin. Couldn't be simpler.

Give that user SELECT and LOCK TABLES privileges and then that user will be allowed to do your backups.
CRON
Now we need to set up the automatic part of the fun. Linux has a built in scheduler called CRON. We can access cron from any user and obviously, root users' cron can do more than regular users' cron. That's why we wanted to make sure we could make the mysqldump at the command line NOT with sudo at the beginning, but just as a regular ol' cowboy.
To edit the crontab, we access it like this:
cowboy@freddythunder:~$ crontab -e
This will use your default editor. I prefer vim but there are a bunch out there. You can update which editor you want to use by doing this:
cowboy@freddythunder:~$ export EDITOR="vim"
In your crontab, you will want to put this line of code. The time and interval may vary to your tastes:
0 5 * * * mysqldump --user=dumper --password=dumppass databasetexas>/mnt/thumb/dbtx.sql
When you save it, linux should be kind enough to tell you that it is installing your crontab. If you ever want to see your cron at any time, you can do crontab -l to list it out. This will run your command at 5 am every day, every week, every month. Basically, the 5 space separated 'fields' in your crontab are seconds,minutes,days,weeks,months. First thing I did when I was learning this was sent myself an email every second. Let it go for a while. Erased thousands of emails. There are other options and things with CRON but I think I will make a different post for that one.
Last step is the next day, check out your files on the thumbdrive and see if it made you a database copy:
cowboy@freddythunder:~$ ls -l /mnt/thumb


total 1904


-rwxrwxrwx 1 cowboy cowboy 1940649 Dec  6 05:00 dbtx.sql


cowboy@freddythunder:~$
If you see that, and the date is today's date, and that number before the month is not a zero, then you are successful in all that you do! Congratulations smart person!!
Comments
Categories
- Stupid Stories 65
- On My Commute 31
- Computer Programming 21
- Italian Dual Citizenship 11
- Food 8
- Black Lives Do Matter 8
- The Beast 6
- Not So Stupid Stories 6
- Quick Projects 5
- Playing Out 5
- Movies I've Made 4
- Old Man Rants 3
- Scams 3
- The Robot Sbot 2
- Other's Music 2
- Film Projects 2
- Programming Tutorials 2
- Making Movies 2
- Rental Car Reviews 1
- My Original Music 1
- 3D Printing 1
- Ryvid Anthem 1


